


Welcome to Week 5!
Our theme this week is "Fabric"
There isn't much to say this time around so let's just get straight to business!
If you want to see the results from last week CLICK HERE
For weeks 1-4 CLICK HERE

1- Miss Mustard Seed- French Curtains
I am a girl who loves fabric. I get giddy at a good remnant bin. Don't buy me flowers, get me a gift card to a fabric store. I've spent many days and nights hunched over my sewing machine making things for my home out of fabric, but my most dramatic project is the half canopy I recently made for our master bedroom.


My tutorial on this project may make your head spin, but it's really very simple. If you can sew in a straight line and use a staple gun, you can make this. Visit my blog for more sewing tips and projects.


Rich, bright, happy fabrics
becomes

~A Patchwork Chair Cushion~
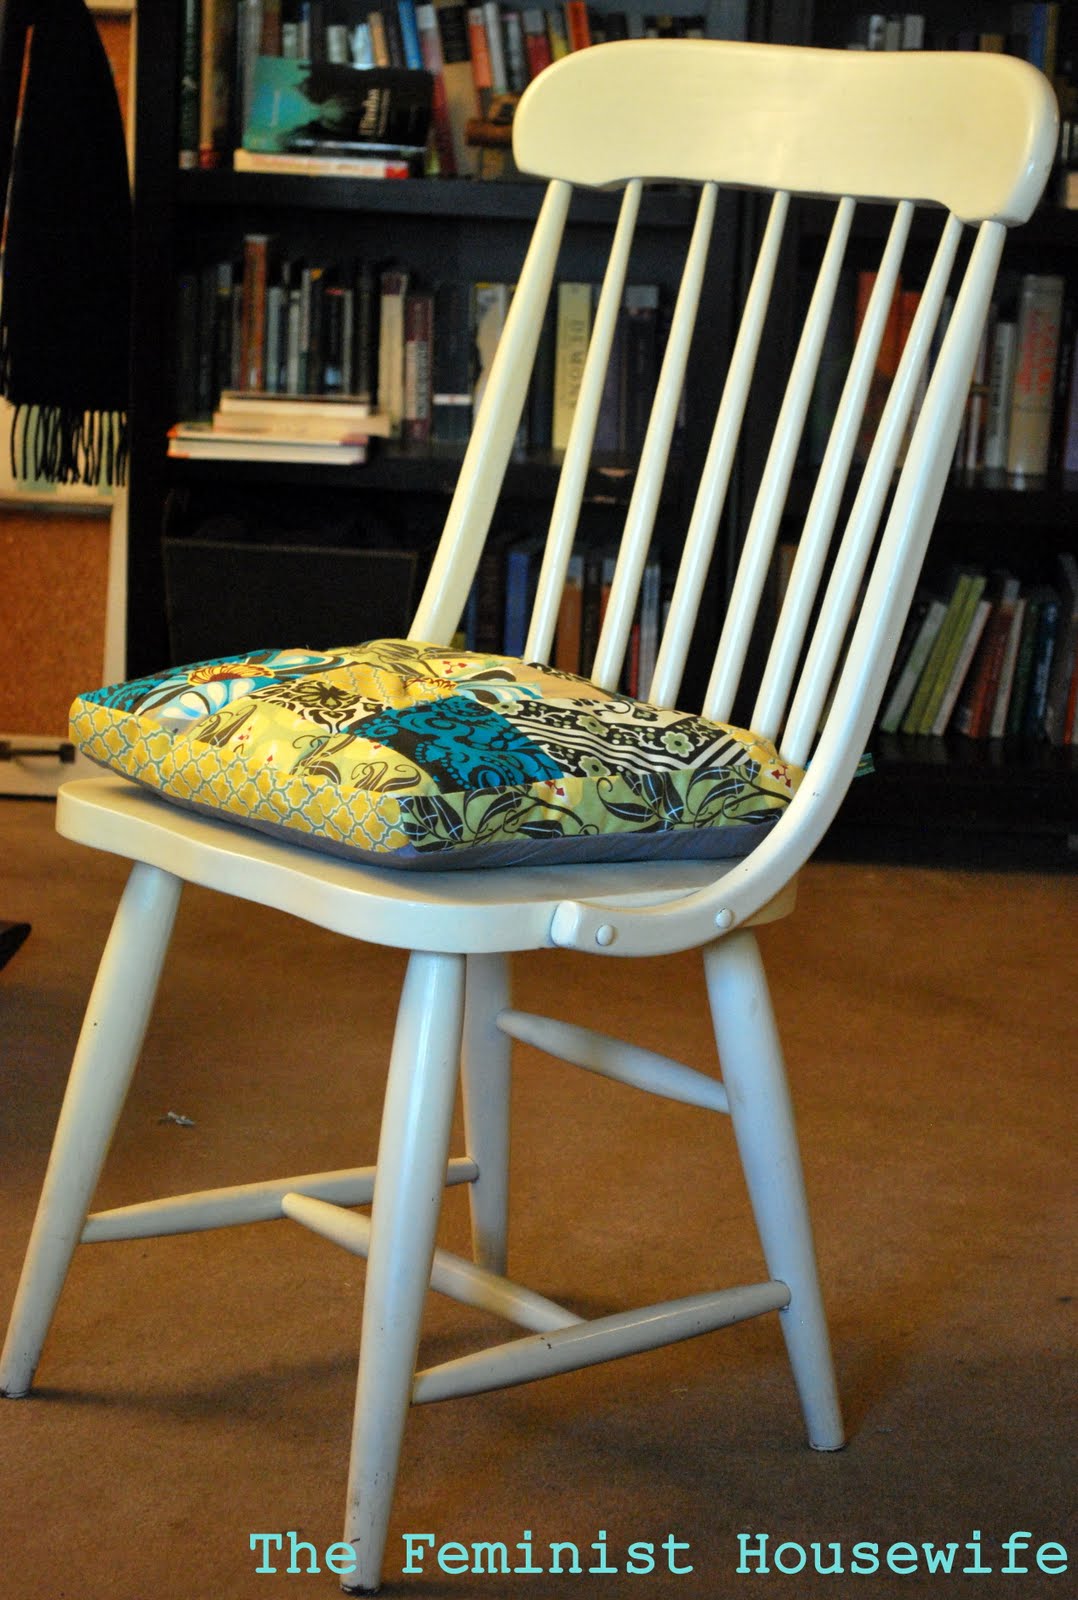
To make your tushy feel cushy!

I have been coveting some Anthropologie chair cushions for months now, but did not want to shell out $140 for four of them. But, I am a novice sewer; I've only had my machine for a couple months. If I can sew this, anyone can! To make this chair cushion, I thought of it as a puzzle- fitting the pieces of fabric together. I love Amy Butler fabrics, so I knew that they would be perfect for this project. And, I spent less on making four of them, then it cost to buy one from Anthropologie.
For more photos and ideas visit The Feminist Housewife!

#3- All Things Thrifty- Upholstered Headboard
Fabric and decorating go hand in hand. Fabric is a great way to introduce color and texture into almost any room.
Our master bedroom has been a work in progress for several months. The first decision we made was the color pallet, and we decided on gray, yellow, white, and black. After that decision was made, I searched for the perfect fabric for our headboard. I was REALLY excited to find this fabric at Home Fabrics and Rugs for only $5.99 a yard. Sidenote: Home Fabrics is by far my favorite fabric store, and I have bought fabric there at $1.00 a yard multiple times. I get butterflies thinking about it!
The total cost of the headboard was right around $80.00.
 The headboard consists of 17 upholstered blocks. Believe me, this project has been tedious. With the help of my husband, we configured the measurements to make sure that each block was precisely the same size and pattern. The image below shows more of the process, but detailed instructions can be found at All Things Thrifty.
 To balance out the room, I chose an array of pillows in differing sizes and textures. One of the biggest myths in decorating is that you must MATCH your fabrics throughout your space. I do not like "matchy matchy," so I tend to choose fabrics that complement each other but are very different. As you can see in the image below, the pillows carry on the color scheme and are all different textures and styles.
 The yellow bedside tables were $15.00 each a the local thrift store, and I painted and glazed them to create the look I was going for. The lamps were also a real find at $8.00 each at the local thrift store. I sprayed them an oil rubbed bronze color to also match the color scheme.
 I decided to add another punch of color by folding up some yellow fabric across the base of the bed to introduce more yellow into the room. I think it adds a good balance to the room.
The headboard was designed to be the focal point of the room, and it is extremely big. It takes up the whole wall! I LOVE IT! I hope you like it too.

If you would like detailed instructions, please hop on over to All Things Thrifty. I hope to see ya there!
All in all, I'm thrilled with how this bright and cheery room turned out!
#4-Flea Market Trixie- Framed Burlap Print
For the fabric challenge I made a personal framed burlap print. I bought this lovely frame at a garage sale for......$1.00. I couldn't believe it myself when I asked how much and she replied a dollar. Boy do I love a bargain.

I'm really into burlap right now and love all the vintage burlap feed sacks, however I don't like the high price tag that comes with them. So I decided I would make one. I made it personal to our family. To see how I made this, visit me Here

In English it means....... The house filled with love and many animals.
King is my maiden name and Wills is my boyfriends last name, hence King Wills and No.2810 is our house number.

Visit me Here to find out more about printing onto burlap.

#5- FunkyJunk Interiors- Hanger Curtains
~ Hanging with Fabric ~
I don't sew. Or should I say, I haven't sewn since my sewing machine took an upside down tumble six months ago and continues to sit in that very position under a pile of junk in the basement.

I don't sew. Or should I say, I haven't sewn since my sewing machine took an upside down tumble six months ago and continues to sit in that very position under a pile of junk in the basement.
I liked it upside down just fine until the fabric topic for So You Think came up. After mild panic set in, I realized, 'I just gotta be me'. Funk my project up so you don't need a sewing machine, right? I can do that. :)

Pick your hardware! A woodsy antique hanger with weathered clothespins becomes today's chosen gear. If you like a look that's a little more refined, going new on both these items will give you a totally different look.

Choose your fabric! Whether it's sheets or burlap, most any will do. Just keep in mind, thicker materials will have bigger ruffles and a more casual appearance. I chose a painter's drop cloth for this application.
Let's dress it up! Some cute buttons and mini twine create a little rustic bling to an otherwise fairly plain canvas. Other options are ribbon, metal charms, pearls, pretty fringe ... anything is possible depending on what look you desire!

Buttons were first sewn on, then the twine later thread through the holes. Allowing the twine to dance it's way down the curtains adds some additional fun interest.

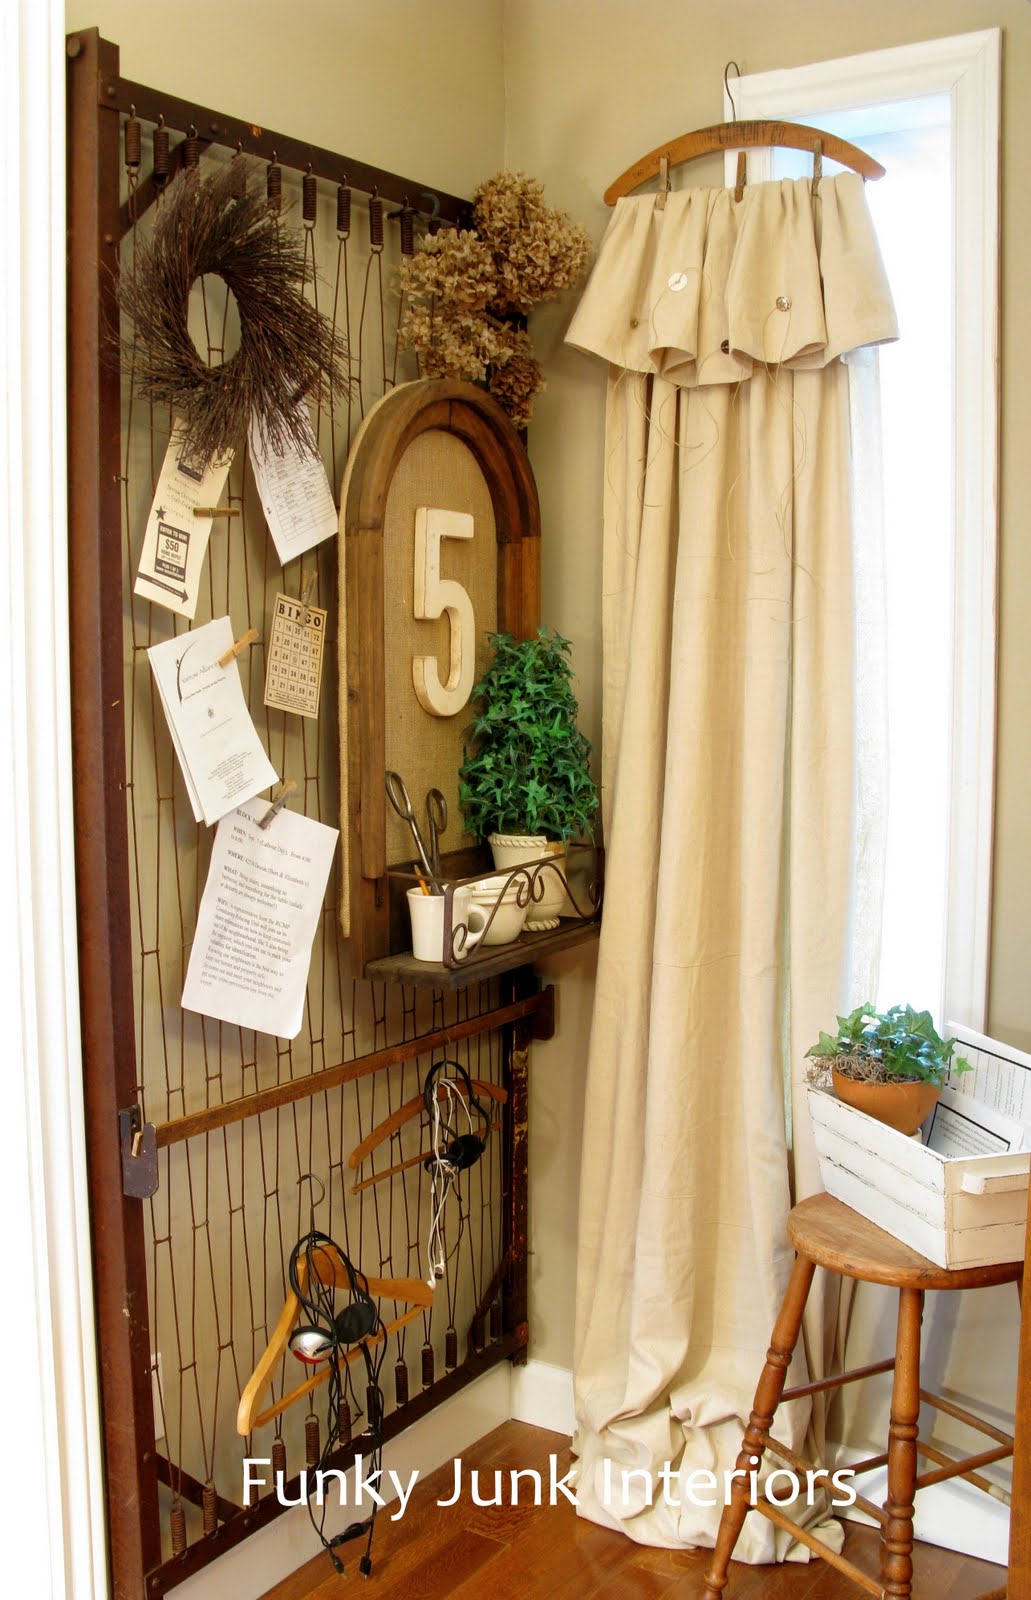
Welcome to the funky originator of the no-sew-no-tools-required hanger curtains! Simple in design, however elaborate in uniqueness, perfect for warming up an otherwise tall and skinny very boring window I once disliked very much. Now? I wish I had more! Ok, I do. One more to go. :)
Many more pictures on how these curtains were created are on my blog at Funky Junk Interiors. Hope to see you there!

#6- Welcome to the Turner Farm- Luncheon
Fabric: The structure of anything; the manner in which the parts of a thing are united; workmanship, texture, make, as cloth of a beautiful fabric. - brainy quotes

As a chef, it is my job in the back of the house (the kitchen) to ensure that the meals I prepare are as pleasing to the eye as they are to the palate. In many dishes, it is the layering of the flavors, as well as, the layering of the plate, that will send a dish over the top. My favorite fall back dishes are those that comfort me with a welcome home flavor and are plated country style
Touches to the front of the house (dining room where guests will be served), are viewed in a similar manner.
Start with the finest ingredients.

Add layers of flavor

Use the recipe as a guideline. Always make it your own!

Add a hint of the unexpected

Enjoy with Good Friends

#7- Shabby Nest- Drapes & Pillows
I must admit that I have a bit of a fabric obsession. It's amazing what fabric can do for a room. Let's take my son's room for example. A typical basement bedroom. It has a very small window which doesn't provide much in the way of a focal point. (or much light for that matter, so please forgive the photography.)

Here's the after of that same room...with fabric added in the form of a roman shade, drapes and accent pillows. What a difference!!

First up, the roman shades and drapes. I actually made the shades using a vinyl mini-blind, Fabritac glue, and denim. A super easy way to create custom roman shades in whatever fabric you choose. The drapes were created using blue and white ticking fabric. They were very simple to sew. I chose not to create a rod pocket, so all I did was hem the top and bottom, leaving the selvages instead of hemming the sides. Then I pinched the tops and attached curtain rings to hang them.

In this photo, you can see the way the ticking drapes frame out the bed. The addition of handmade accent pillows adds softness and personality to the bed.
 I made these pillows using one of my favorite tricks...photo transfer paper. I just love my son's handsome face looking back from his bed...even when he's not sleeping in it. The firetruck pillow features a vintage firetruck photo and more blue ticking to tie in with the drapes.
For more information on how to create the roman shade and the photo pillows, please join me at my blog, The Shabby Nest.
xoxo
Wendy

And there ya have it!
another wonderful week full of inspirational projects!
Now scroll on up to the top right corner to vote for your favorite 2!
There will be no Wednesday spotlight this week as no one was sent home so I'll just see ya Saturday for the results!

And there ya have it!
another wonderful week full of inspirational projects!
Now scroll on up to the top right corner to vote for your favorite 2!
There will be no Wednesday spotlight this week as no one was sent home so I'll just see ya Saturday for the results!


Such beautiful creations! I gotta think a little bit on this one!!!! How can I vote? I mean, really. Is there a way to hold the control key and vote for everyone??? (kidding!)
ReplyDeleteI am in love with that headboard...beautiful!
ReplyDeleteIt was a tricky one!
ReplyDeleteWOW! What an AMAZING headboard!! It is LOVELY!
ReplyDeleteOk love this-first time i have seen-read all of these-
ReplyDeleteCan anyone try this?
How fun and lovely to see fellow well known bloggers doing these projects.
Karryann
I really love your designs most especially the one that you did at the back of the bed. The decoration that you put there. The curtains and the pillows.
ReplyDeleteJohn Taylor
liverpool blinds Quick Tips to dress up your room without breaking the bank
Wow! They are all fab!!! Now to vote!
ReplyDeleteHugs
SueAnn
Yeah! I'm so glad no one had to say goodbye. I need all the inspiration I can get. In LOVE with both the headboard ideas.
ReplyDeleteOkay, this just keeps getting more and more difficult to pick just two each week. I've decided that I'm going to be the overall winner in this contest because I've got so many new ideas to use all thanks to these talented women.
ReplyDeleteNow, I'm going right over and figure out how I can make my own burlap framed piece.
Thanks so much for sharing all these wonderful projects with me.
Smiles,
Carol
The headboard is by far my favorite! Good job girls :)
ReplyDeleteI can't wait to try out the burlap print! It looks amazing on their wall.
ReplyDeleteToo many good ones to choose...but if I could crawl into one of these pictures right now, I would curl up in that canopy bed and sleep until morning. It looks like a million bucks.
ReplyDelete- philsimms
I'm having a tough time deciding how to vote on this segment. There are so many good ideas and creativity.
ReplyDelete~elaine~
I love the headboard!! Awesome!
ReplyDeleteMy gosh there is so much talent I don't even know what to do about it ;) thanks for posting!
ReplyDelete