


Welcome to Week 6!
CLICK HERE for all subsequent weeks and HERE for the results of last week
This week we have a rather significant change....
you can only vote for 1 entry from here on out! So choose carefully!
Our theme this week is PAINT

#1 The Feminist Housewife- Photo PaintingPaint is what brings life to our homes, words to our art, and joy to an old piece of furniture.
I love art. And when I heard that this week's theme was paint, I ecstatically pulled out my paint brushes and acrylics.

Gel Medium brushed on my canvas before placing the photo on it.
Using acrylic paint, Golden Gel Medium, a laser-printed photo of my son, Dmitri, and paper flowers, I created a work of art that I will treasure, a piece that captured my son's first Easter.

The black and white photo pre-paint.
I transferred the black and white photo of Dmitri onto my canvas using the Golden Gel Medium. Using the flowers in the background as a guide, I painted the daffodils yellow and green using acrylic paint.

I added paper flowers to add dimension to the work.

The framed result:

Although this project took patience, it is pretty simple and you don't have to be an artist or a skilled painter to do it! The possibilities are endless. For a detailed tutorial and to ask questions, visit The Feminist Housewife!

#2- Shabby Nest- Wall Stripe
Never underestimate the power of paint! It is one of my favorite decorating tools. This is the room that all three of my boys shared in our previous house. It was large, but it was long and narrow. I wanted to create the illusion of width, so I decided to use a wide horizontal stripe around the entire room.
 Because I used a single wide stripe, the eye is drawn from side to side across the room making it seem wider.
The stripe was very easy to create. First I painted the blue base coat. After it was thoroughly dry, I measured and taped off the line with painter's tape. Here's a tip...seal the inside of painter's tape by painting the tape edges with a bit of the base coat color first. Then when you paint the stripe color it won't leak under the painter's tape...preventing messes when you remove the tape.
 I chose to paint the stripe about 2/3 of the way up the wall...the perfect height for hanging artwork. (or towels...)
Because the stripe reminded me a little bit of a racing stripe...the pennant flags above the crib seemed perfect.

Stripes like this one can be used in just about any room to add visual interest...use subtler colors for a more sophisticated look, or even create a stripe with chalkboard or magnetic paint for a more whimsical approach!
 But don't forget...paint is the decorator's best friend! It certainly made all the difference in this room!
Join me at my blog, the Shabby Nest, for more fun painting ideas!
xoxo
Wendy
#3- Vanity Chalkboard Desk
As a decorative artist, you'd think it would be easy for me to pick something to submit for "paint" week, but it was actually really hard. I had so many things to choose from! I decided to go with a piece that was a lot of fun for me to work on - my Queen Anne vanity turned chalkboard desk.

Here's the before. I purchased this vanity (with a mirror attached) at an estate/yard sale for $20.00. It was sturdy and had functioning drawers, but it had a lot of water damage and the finish showed it.
 I sanded the piece, applied a coat of bonding primer and two coats of semi-gloss paint with my sprayer. I wish I could tell you the color of red I used (because I know the questions are coming), but I mixed this one myself. It is SW Rave Red with some Raw Umber universal tint mixed in to tone it down. I also rubbed some dark walnut stain over the finished product to further tone down the red and give it an aged look. The handles were sprayed in Krylon's oil rubbed bronze.
I measured out the chalkboard top and taped it off with my trusty Frog Tape. I then painted on two coats of chalkboard paint with a foam roller and allowed it to dry before adding a hand painted decorative border in white acrylic paint.

I liked the idea of a painted border to soften the hard lines of the chalkboard and marry the modern idea of chalkboard furniture with the traditional Queen Anne style of the piece.

Visit my blog for more hand painted furniture, murals, and my painting and home decor tips and tricks.

#4- Funky Junk Interiors- Wooden Crate Stairs
I've always loved the look of stamped numbers and logos on wooden crates. So when the PAINT theme came up for So You Think, I had an idea I'd never seen done before. Would it work?!?

Come on in and see. :)


The stairs were designed to alternate light and dark tones as the area isn't well lit by natural light. In addition to tones, a variation in riser trims were thrown in here and there to shake the look up abit. :)

The end result is something so fun and outrageous, you can't help but smile. :) And a funny story? My two cats think there's something on the stairs so they wind themselves around each logo as they use them. :)

What I totally love about the whole thing is, the more banged up and paint splattered the stairs previously were, the more authentic my old crate stairs appeared! There is simply nothing to lose in ripping off old carpet and painting your stairs. The stairway can always be covered with carpet right on top of the wildness at any time. And I won't be covering up mine any time soon. :)
For more thoughts and MANY more pictures of the process, please visit my blog, Funky Junk Interiors.

#5- Leaf Stenciled Wall
Adding paint to your walls is one of the easiest and cheapest ways to make your home your own. When we moved into our house, every wall was tan. I felt like I was drowning in T.A.N. Don't get me wrong, I love tan to a certain extent, but I needed a little variety. Below is a picture of my office. Do you want to know how to create this wall in your home? Creating a wall like this is much easier than you may think, and it only cost me around $12.00! Don't believe me? Keep reading! :)
 Items needed: Painter's tape, scissors, wax paper, paint in the color of your choice, and a little paintable caulk. (Click on image to enlarge).
Step 1: Cover a sheet of wax paper with painter's tape. (see above image)
Step 2: Cut out leaves in varying sizes, and peel off the wax paper.
Step 3: Stick the painter's tape leaves on the wall where you want them (see below image...we were not quite done yet when I took this picture). You want to make sure that the edges of the tape are pressed firmly against the wall.
Painting tip: If you use a small amount of paintable caulk along the edge of the tape and let it dry before you paint over it, it will seal the edge and prevent bleeding. Doing this will you give you a nice clean, crisp line with no touch ups needed when you peel the tape off. (See illustration in the collage above).
 Step 4: Paint the wall.
Sidenote: I ALWAYS check for "OOPS" paint when I go to Home Depot. These are paints that didn't get mixed quite right, and Home Depot sells them for $5.00 a gallon. I lucked out and found a scrupulous blue Ralph Lauren gallon of metallic paint. And if you plan to only paint one wall...why pay full price when you will only need 1/2 a gallon anyway!?!?
Total Cost: $6.00 for painter's tape, $5.00 for a gallon of oops paint, $1.00 for paintable caulk=$12.00!
 I was thrilled with the end result. Don't be afraid to paint your walls. This is definitely a crowd stopper in our home. Visitors love it!
  There are SO many ways you can use this concept. A reader wrote in and said she traced flowers off her little girls bed spread and painted those on the wall...truly, the possibilities are endless. If you'd like to see some of our reader's projects using this concept, please visit us at All Things Thrifty.
#6- Painted Dresser
I really love painted furniture and almost every piece in my house is painted. You can really save money buying used furniture and turning it into something that is uniquely yours, not to mention the superior quality of vintage furniture compared to today's furniture. Paint is by far the least inexpensive way to transform either an entire room or just a small piece of furniture.
I purchased this dresser last week on craigslist for $20.00, it just needed to be spruced up with some paint.

After I was done painting it I realized the finished color was almost the same as the original, but there's something about cream colored furniture that appeals to me.
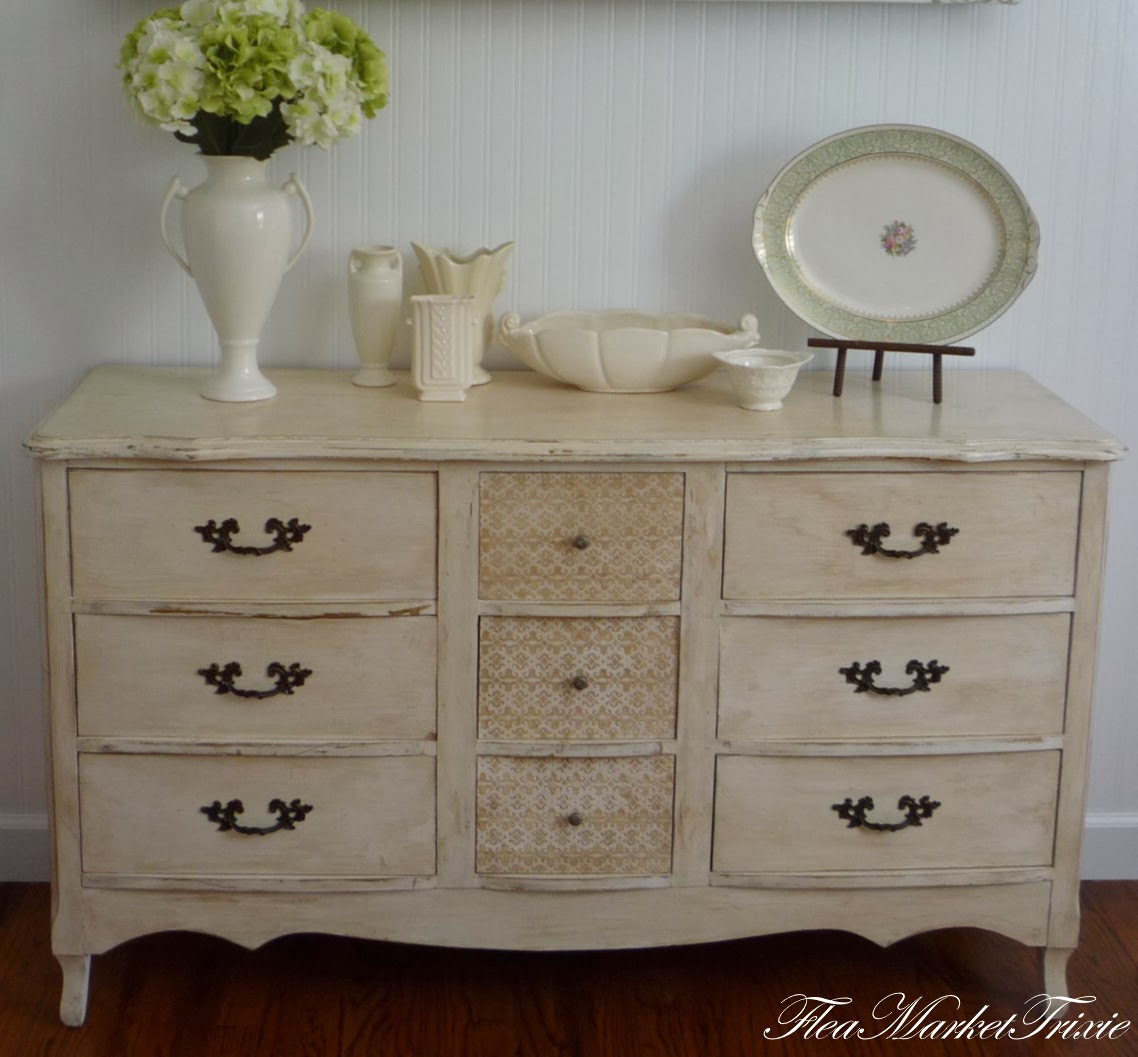


I really think it has character now with the textured middle drawers. I used a modeling paste from DecoArt and a stencil to achieve this look, and you'll never guess what I used to age the paint. To see the turtorial, visit me Here.
And there ya have it!! Now scroll on up and vote for 1 entry!
See you Wednesday as we Q & A Laurie at Welcome to the Turner Farm!


oh these are lovely and I have two favourites... time too toss a coin. ;)
ReplyDeleteonly ONE CHOICE?! ... THE HORROR!
ReplyDeleteYou ladies make it hard to vote.
you're all so talented.
Only one vote!?! You about broke my heart!!!!! But I somehow managed to narrow it down. I apologize to the other 5 of you! This was tough!
ReplyDeleteThis is the hardest week to vote for me. I. Love. Every. One. They are so unique and individual.
ReplyDeleteSo beautiful...each and every one!! Who to chose...oh dear!! So many I love! Sigh!! I go to vote now!
ReplyDeleteHugs
SueAnn
Yeah its really very beautiful pictures. thanks for sharing with us...
ReplyDeleteThis is the hardest one to pick yet! And now only one vote? Gah! I love them all!
ReplyDeleteI LOVED this week! It makes me want to try all of the techniques in my own home!
ReplyDeleteleaf stenciled wall #5. They were all good but I just liked this one best :)
ReplyDeleteThe paint of the room captured my attention. I like it. I will paint my room like that, its really perfect for me because my favorite colors are white and blue.. Thank you!
ReplyDeleteJohn Taylor
liverpool blinds Quick Tips to dress up your room without breaking the bank